Densetsu no Starfy 2/Test Stage-3
Only in Japan!
| |

|
Gomen'nasai! This article is related to a game, manga series or other media that has not been released outside Japan. The coverage here may differ from what it would be in an official translation. |
This article's title is a fan name.
| |

|
An official name for the article's subject has not been found, so it uses a non-official name at Densetsu no Starfy 2/Test Stage-3. If you know an official name, please request the page to be moved at Category talk:Articles with conjectural names. |
Not to be confused with Test Stage-3 from Densetsu no Starfy 3.

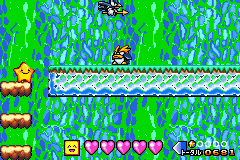
Test Stage-3 is the third area in Densetsu no Starfy 2s Test Stage. It contains 14 maps, each of which use Lobber's Cave's tileset, though the background uses the wrong palette. Each map features a set of non-boss enemies and has nearly identical terrain: An upper section with a flat, grassy platform, which is connected to a lower underwater section by three semi-solid platforms. The surface water isn't animated in any map. The first 11 maps appear to contain enemies corresponding to each regular stage while the last 3 maps have assorted vehicle-exclusive enemies.
Map 1
Map 1 has enemies encountered normally in Lobber's Cave.
- The upper section has a Tobeuo and a Wasawasa.
- The lower section has an Unu, a Gain, a Chokki, a Gyotto, a Pukukame, a Nogo, a Wahi Wahi, and an Ukigame.
Map 2
Map 2 has enemies encountered normally in Gluglug Lagoon.
- The upper section has a Winna, a Nubble, and a Bellybird.
- The lower section has a Modoki, a Guppo, a Meramera, a Pinpin, a Jellysquish, and a Snark.
- A Hirapa appears to be missing.
Map 3
Map 3 has enemies encountered normally in Turtle Turtle Land.
- The upper section has a Norinori, a Torabera, a Togesenbon, and a Ikametto.
- The lower section has a Monjamin, a Kururi, a Kagibanrei, a Chingyo, and a Sawawa.
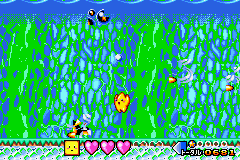
Map 4
Map 4 has enemies encountered normally in Slippery Iceberg. Note: The ground texture is a different color (light-blue as opposed to brown), though it doesn't appear to be slippery. In this map, the tiles composing all the enemies take up too much space for the GBA's VRAM, so the underwater enemies use incorrect tiles. The enemies can still be discerned based on their movements, however.
- The upper section has a Pingoon, a Kachitsuki, a Choby, an Upon, three Korasu, a Togerinu, two blue Stone Statues, and a Togerino.
- The lower section has a Miimii, an Ice Guy, a Shamin, and a Bobfin.
- A Tobeiuo appears to be missing.
-
 Map 4 has differently-colored ground.
 -
 Enemies using incorrect object tiles


Map 5
Map 5 has enemies encountered normally in Large Tree's Forest.
- The upper section has a Piyochiyo, a Mandogora, a Skullpin, and a Pearl Sprite.
- A Komorin hangs from the ceiling of the upper section.
- The lower section has a Monjakku, a Chochin, a Wanekku, a Hebiru, and a Piranya.
Map 6
Map 6 has enemies encountered normally in Pitch Dark Cave.
- The upper section has a Chikku, an Octopult, a Utsubon, and a Bu. Note that there is no "hole" for the Utsubon to come out of, so it appears to emerge from the ground.
- The lower section has a Sukesuke, a Blinkfin, a Gufu , a Wakazo, a Chikugyo, and a Warusaru.
- This map has no Piranyan or Big Nikku, as there are no Meat trees in this map.
- There are also no Ku, Riku, or Kai, as there is no related puzzle on this map.
Map 7
Map 7 has enemies encountered normally in Yo-Ho Mountains.
- The upper section has a Mo, a Glunk, a Ridokkusu, two Kasakasa, a Pitapita, an Isogin (found half a tile underground), and a Demeka that already came into contact with a Furagura.
- The lower section has a Warugao, a Pizzap, an Uga (uses incorrect tiles), and an Ippon.
- There appear to be no Fork in this map.
Map 8
Map 8 has enemies encountered normally in Pufftop.
- The upper section has a Bogyo (invisible until it pops out of the ground) and a Battafurai.
- The lower section has a Calaminer, a Medatsuka, a Hopalop (walks half a tile below the water surface), a Skelefin, three Sukarupu, and a Sukarudon.
- There appear to be no Mantowani or Imadame in this map.
Map 9
Map 9 has enemies encountered normally in Resshi Lake. Note that enemies appear to use just enough object tiles in VRAM, so the particle effect of Starfy falling into or jumping out of water use the wrong tiles.
- The upper section has a Ukondori, a Sametto, a Arukaseki, a Korudon, and an Umiushi.
- The lower section has a Chumbrella, an Akkou, a Tsurutsura, an Arumonto, a Patrol Crab, and a Sand Snark.
- There appear to be no Ginji or Buyoyon in this map.
Map 10

Map 10 has enemies encountered normally in Torrent's Waterfall. A column of water (textured as coral) spans nearly the entire height of the map, like a waterfall. There is also an additional platform in the upper section, as well as another rectangle of water textured as coral.
- The upper section has a Zuratta and a Hyuruhyuru.
- A Chikkin is on the bottom semi-solid platform.
- The lower section has a Marume, a Urobotto, a Dokazun, a Rock Punk, a Spinebelly, a Rannan (walks half a tile below the water surface), a Kosogyo, and three Shakke.
- There appear to be no Chonmagyo in this map, as they were likely hard-coded to be linked to the cutscene in which Starfy saves Ogyon.
Map 11
Map 11 has enemies encountered normally in Ogura Castle.
- The upper section has a Flunder, a Sky Swimmer, and a Mayucoin.
- The lower section has a Tatsubo and a Springer.
- There appear to be no Trappa in this map.
Map 12
Map 12 has some enemies encountered normally only when Starfy is using a vehicle. The upper section has Ryun, a Balloon, a Sukebon, and a Kigurumi which can be used to spawn the enemies.
- The upper section has a Teppo, a Tsunokkuru, a Lurchin, a Purankudon, and a Hiramei.
- A Gandosu (may use incorrect tiles) hangs from the ceiling of the upper section.
- The lower section has a Marunokon (uses incorrect tiles, but is able to be distinguished from Birinagashi/Piriru because it appears to rotate)
Vehicle Observations
- All of the vehicle-related enemies appear to spawn, regardless of the vehicle Starfy uses.
- Starfy is able to equip one of the other three vehicles on the ground if he is already using one (other vehicles don't despawn).
- The auto-scroll that activates from using Ryun/Sukebon will continue even if Starfy equips a Balloon or Kigurumi afterwards. Note that the auto-scroll moves faster than the Kigurumi's walking speed.
- The Balloon and Sukebon have no interaction with water; they both function underwater as if they were above ground normally. Notably, the Sukebon falls right through the water surface.
- Vehicles do not appear to affect enemies besides the ones that each vehicle is typically encountered with. So, the fire breath from Ryun does not appear to affect enemies typically encountered with the other three vehicles, and neither does scaring with the Kigurumi.
- All vehicle-related enemies will damage Starfy and reset the map regardless of which vehicle he is currently using.
Map 13
Map 13 has more vehicle-related enemies.
- The upper section has a Honouo, a Stangler, a Jerubari, an Enzeru, a Barun, and a Shande/Liftwisp/Jiappo (indiscernible, uses incorrect tiles).
- The lower section has a Komeruto/Merutofi, an Eibi/Ganma, and a Birinagashi/Piriru (all also indiscernible because they use incorrect tiles).
Map 14
Map 14 is the last of the maps in Test Stage-3 and has more vehicle-related enemies.
- The upper section has a Mokku, a Desuroru, a Blokka, an Ogakure, a Shande/Liftwisp/Jiappo, a Mejiro, an Erekirage, and a Barikku.
- A Sazan/Potori hangs from the ceiling of the upper section.
- The lower section has an Eibi/Ganma and a Birinagashi/Piriru.
| List of prerelease information | Densetsu no Starfy • Densetsu no Starfy 2 • Densetsu no Starfy 3 • Densetsu no Starfy 4 • The Legendary Starfy |
|---|---|
| Lists of unused content | Densetsu no Starfy • Densetsu no Starfy 2 (test stage) • Densetsu no Starfy 3 (test stage) • Densetsu no Starfy 4 (test stage, unused models) • The Legendary Starfy (Helpful Stuff, test stage) • Test Stages (general information) |
| Unreleased games | Unused balloon/bubble pushing games / Densetsu no Starfy (Game Boy/Color) |
| Events and TV shows | Nintendo Space World (2000, 2001) • World Hobby Fair (2002, 2006) • Oha Suta • E3 (2009) |
| Media with relevant information | Game Boy Encyclopedia • Gekkan Nintendo • Nintendo Dream • Nintendo Power • Nintendo Spaceworld Official Guidebooks • Websites |